Sharing Notebooks
How to create a Quarto-based notebook using Visual Studio Code and share it in GitHub
About
This document shows the steps required to create a GitHub repository, create a site based on it, clone the repository, add content using Visual Study Code and Quatro and push it back to GitHub so the content can be served as an interactive notebook.
Prerequisites
- Have a GitHub account configured so you can connect via SSH (see Connecting to GitHub with SSH and Adding a new SSH key to your GitHub account, and Push to GitHub without a password using ssh-key in case of errors).
- Install the Quarto document authoring system.
- Install the Visual Studio Code Integrated Development Environment (IDE) and the Quarto VS Code Extension.
Creating a repository on GitHub
Go to your GitHub account, click on the Plus icon (see Figure GitHub main window) and create a New Repository (1).
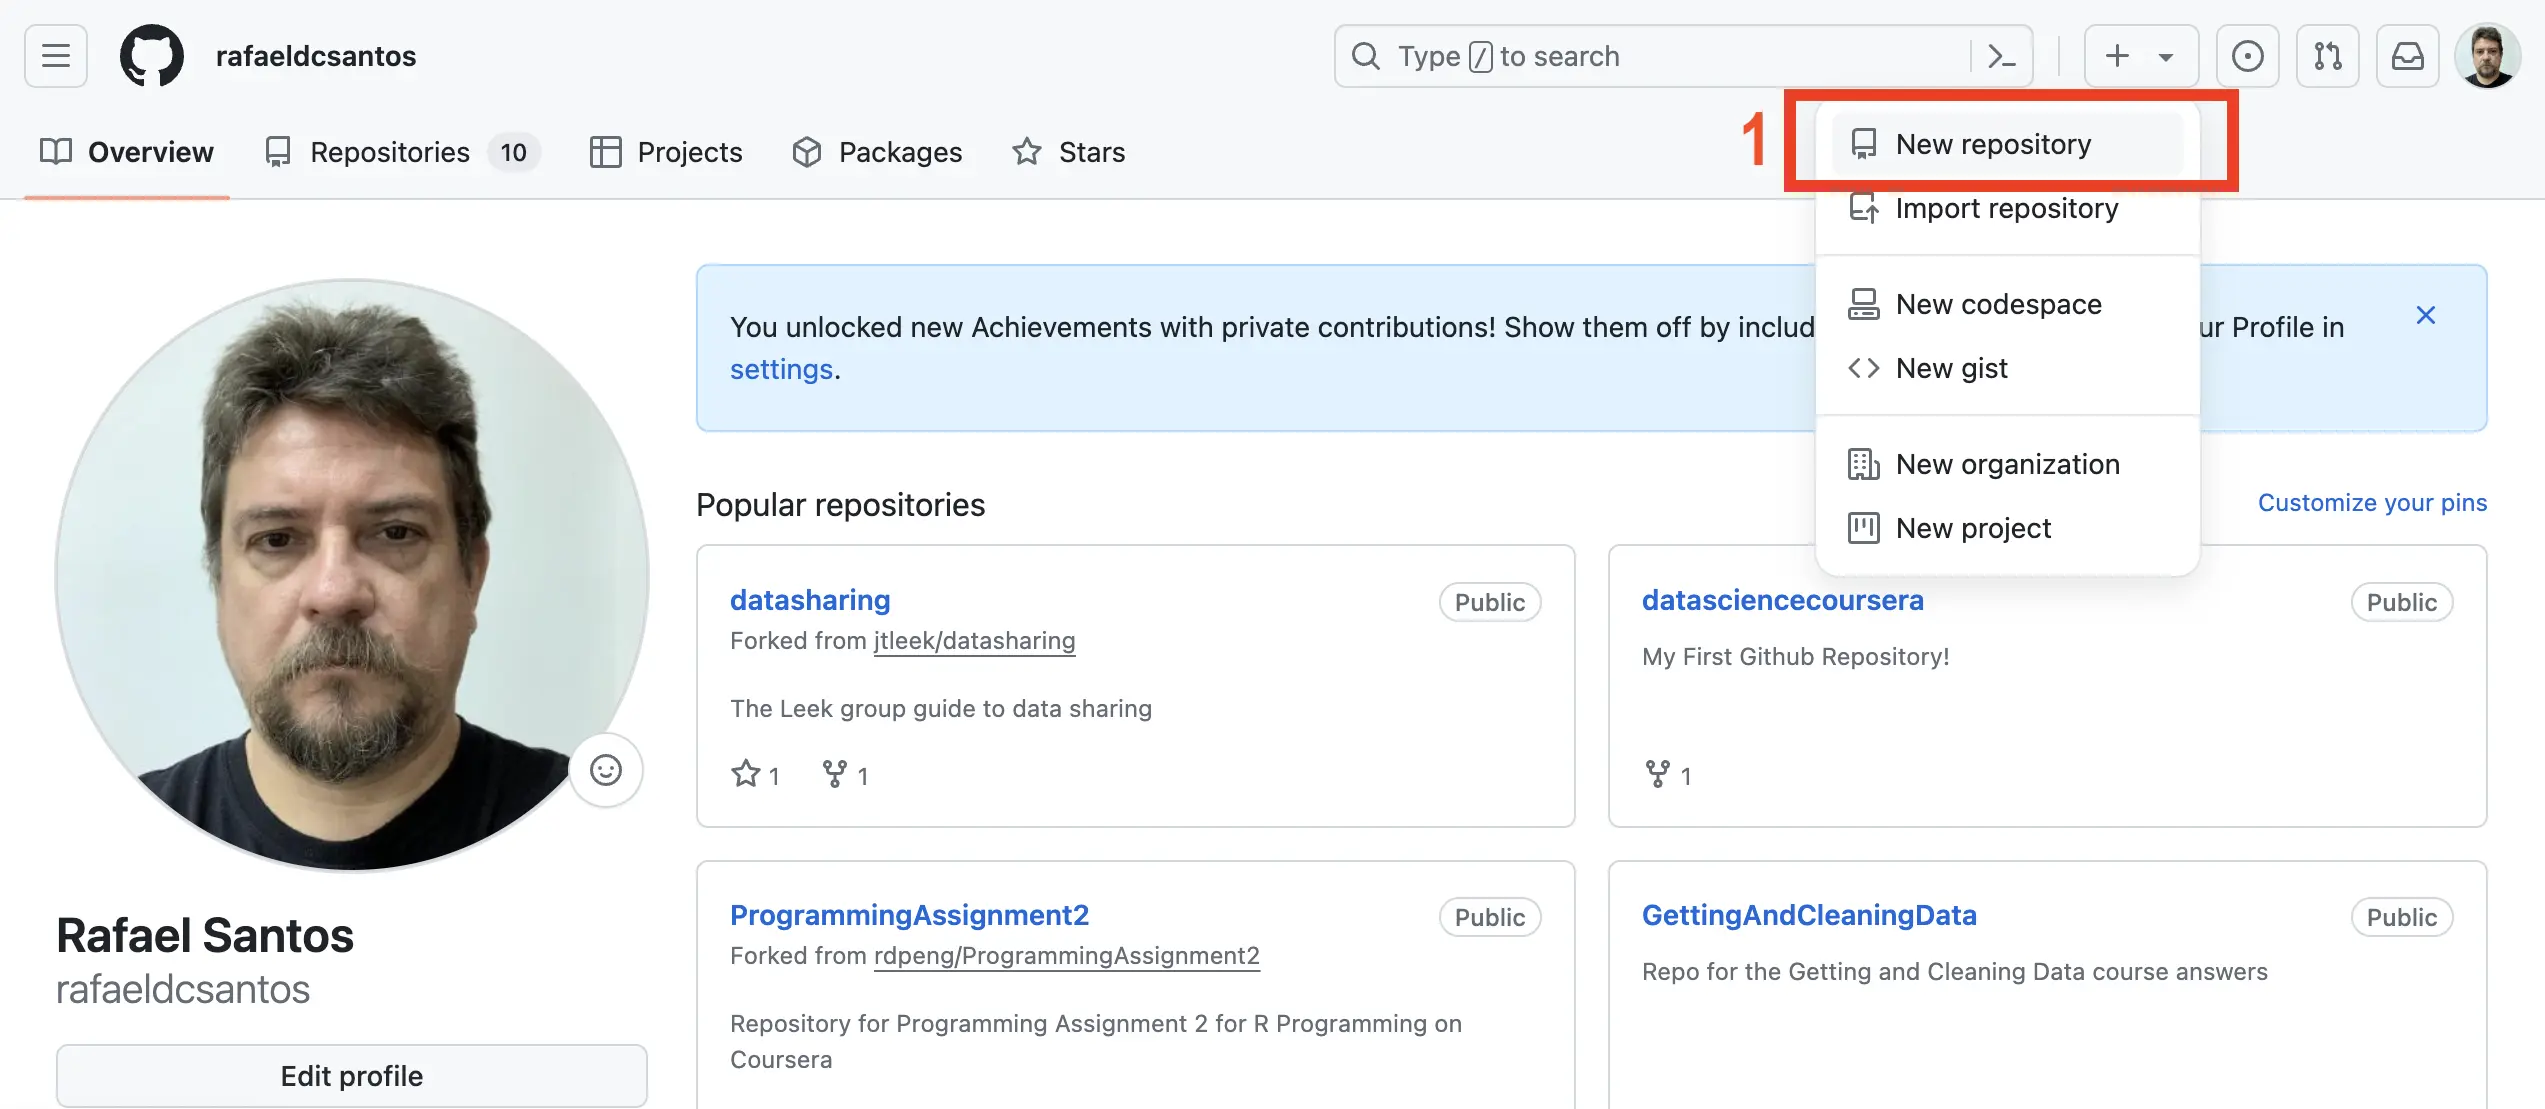
Figure Creating a new repository shows the page that asks for the new repository information. Fill the repository name (2), choose Add a README file (3) and choose a license (4).
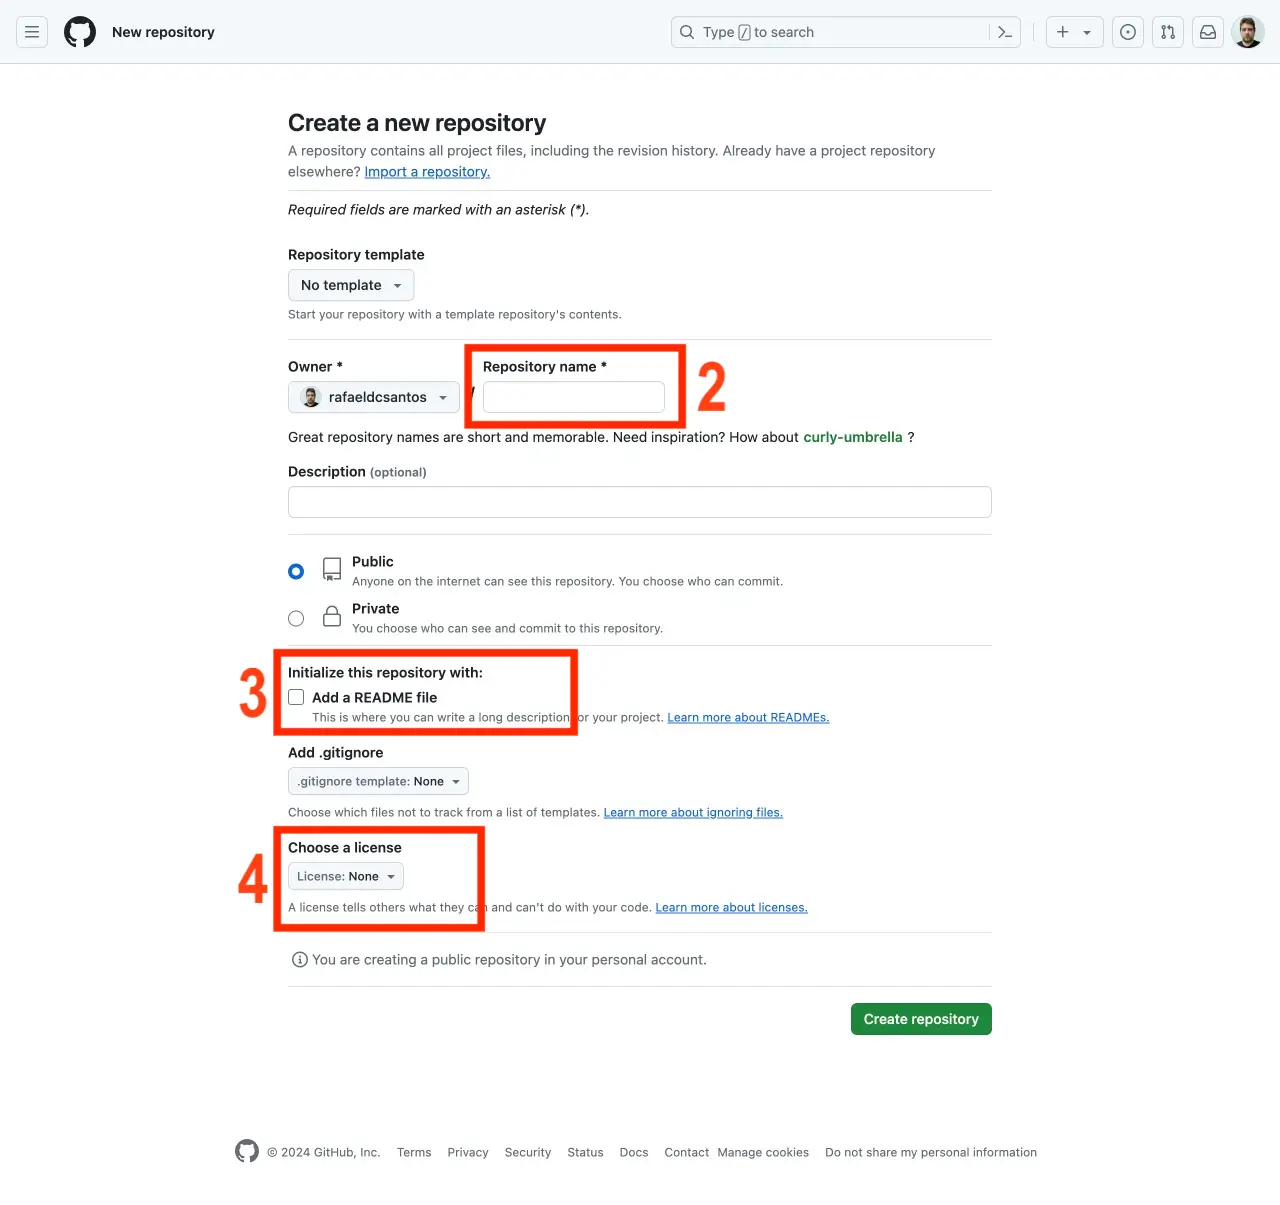
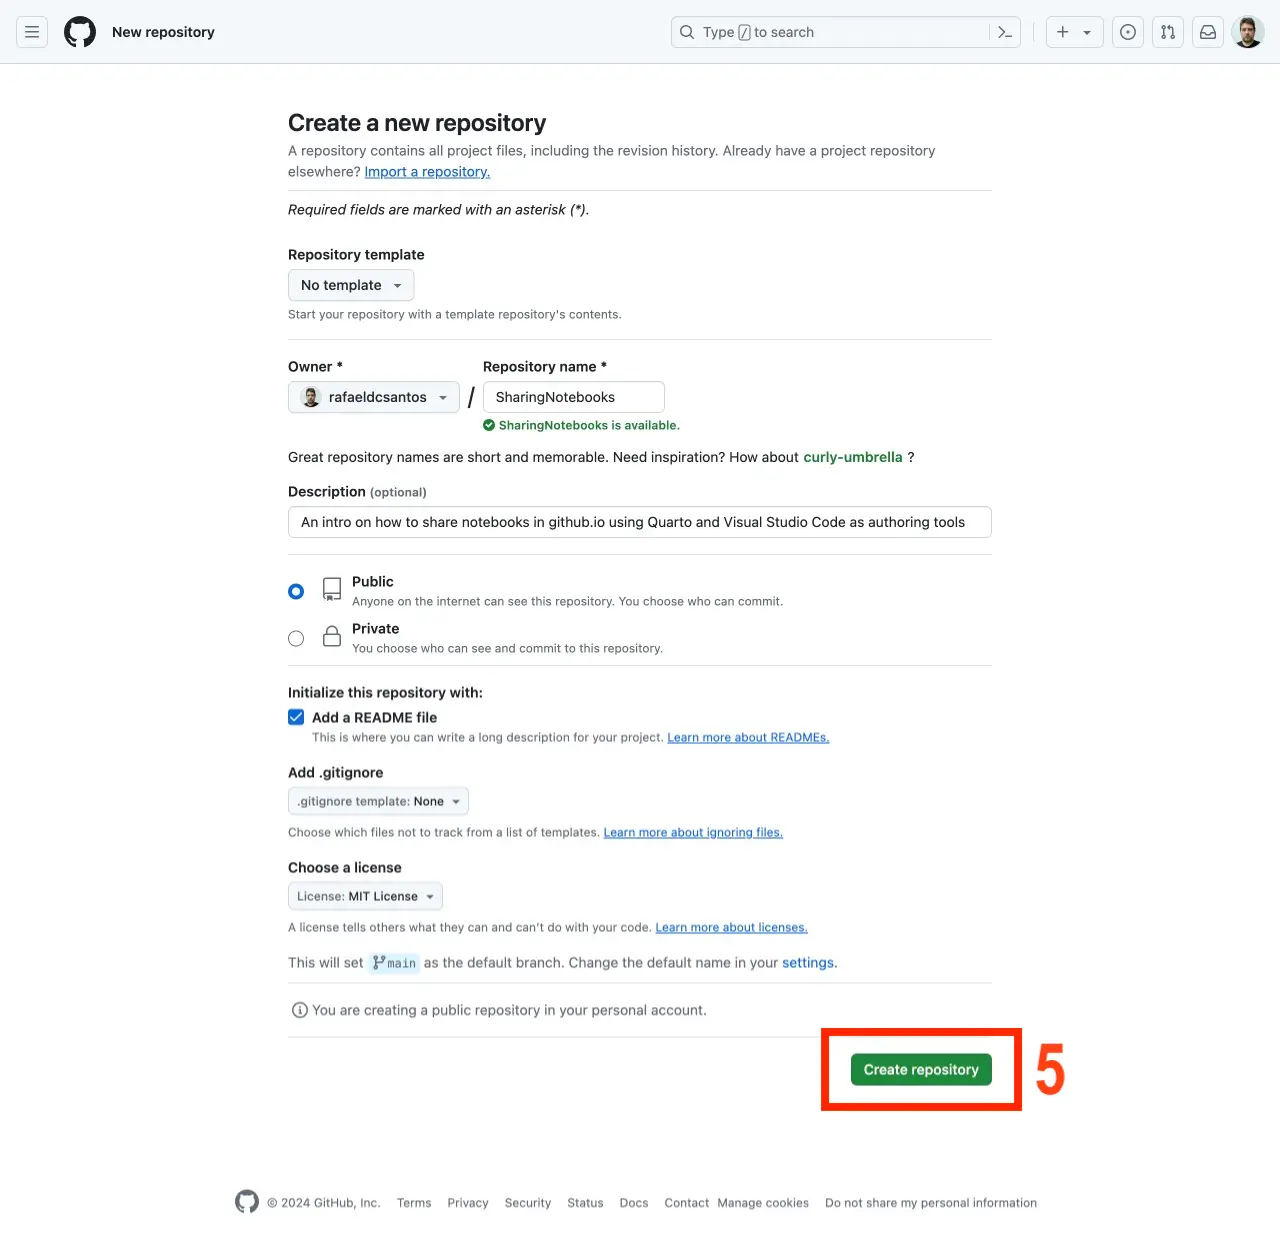
Figure Creating a new repository (filled) shows the page with the new repository information. Click on the Create repository button (5) to create the repository.
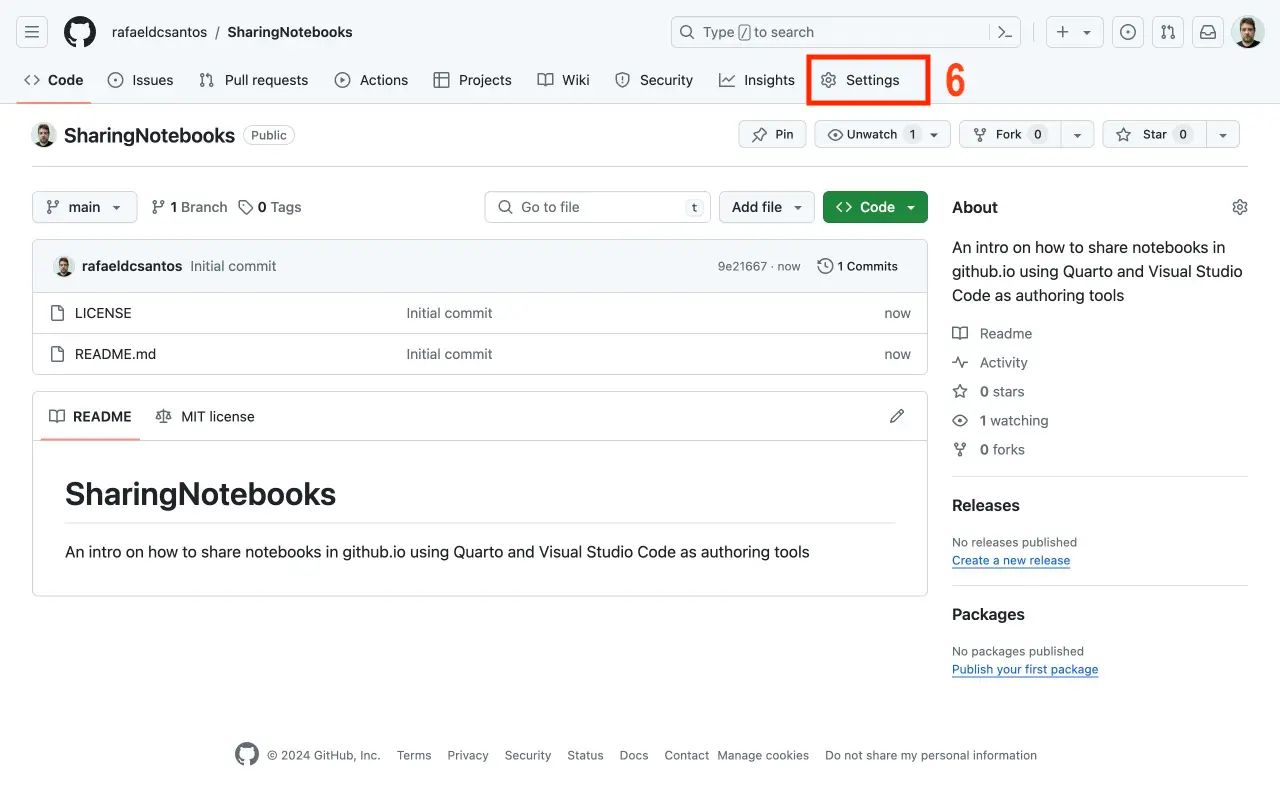
The repository is created and the browser should show its basic information. Now we need to set up a page based on this repository. Click on the Settings option (6) in Figure GitHub page showing the new repository.
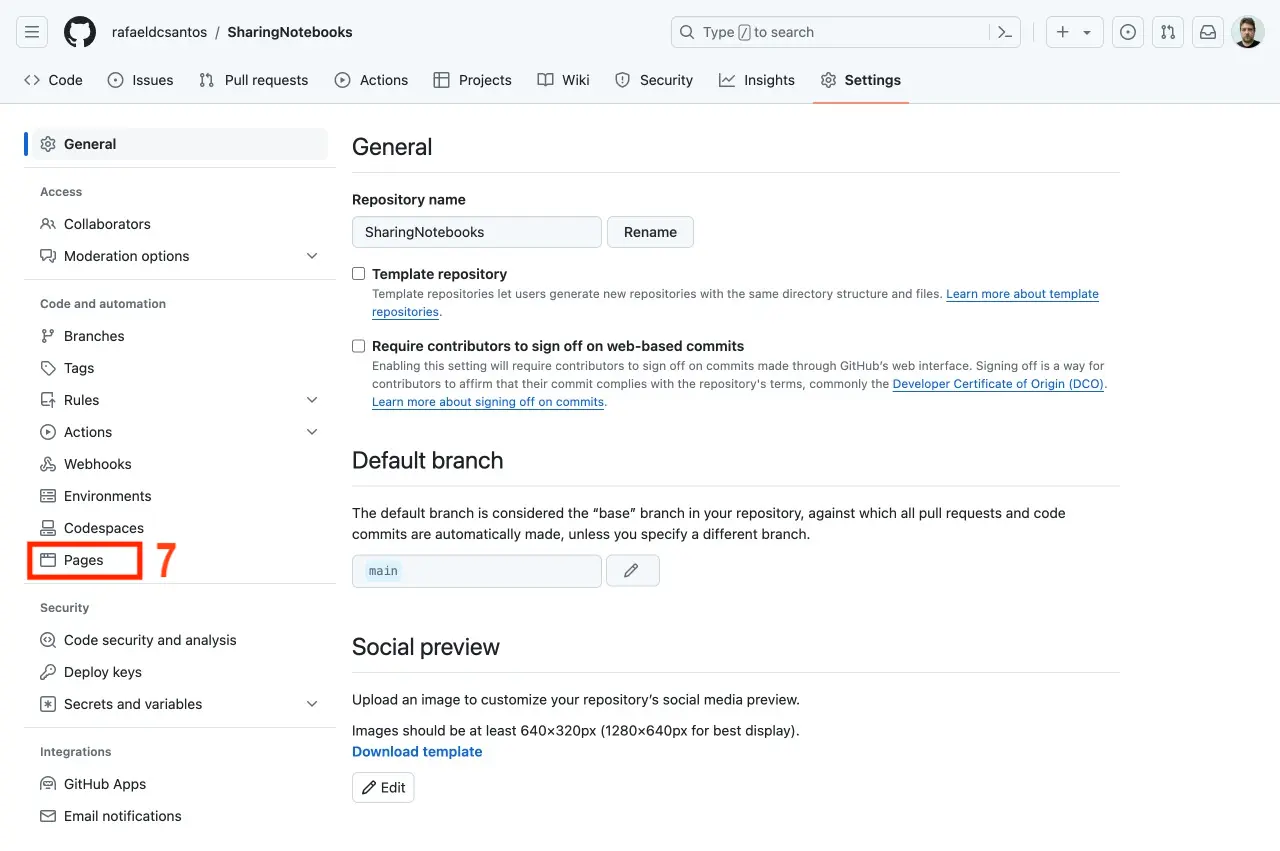
That will bring a page where we can set options for the repository (Figure Settings for the repository). On the left menu, select Pages (7).
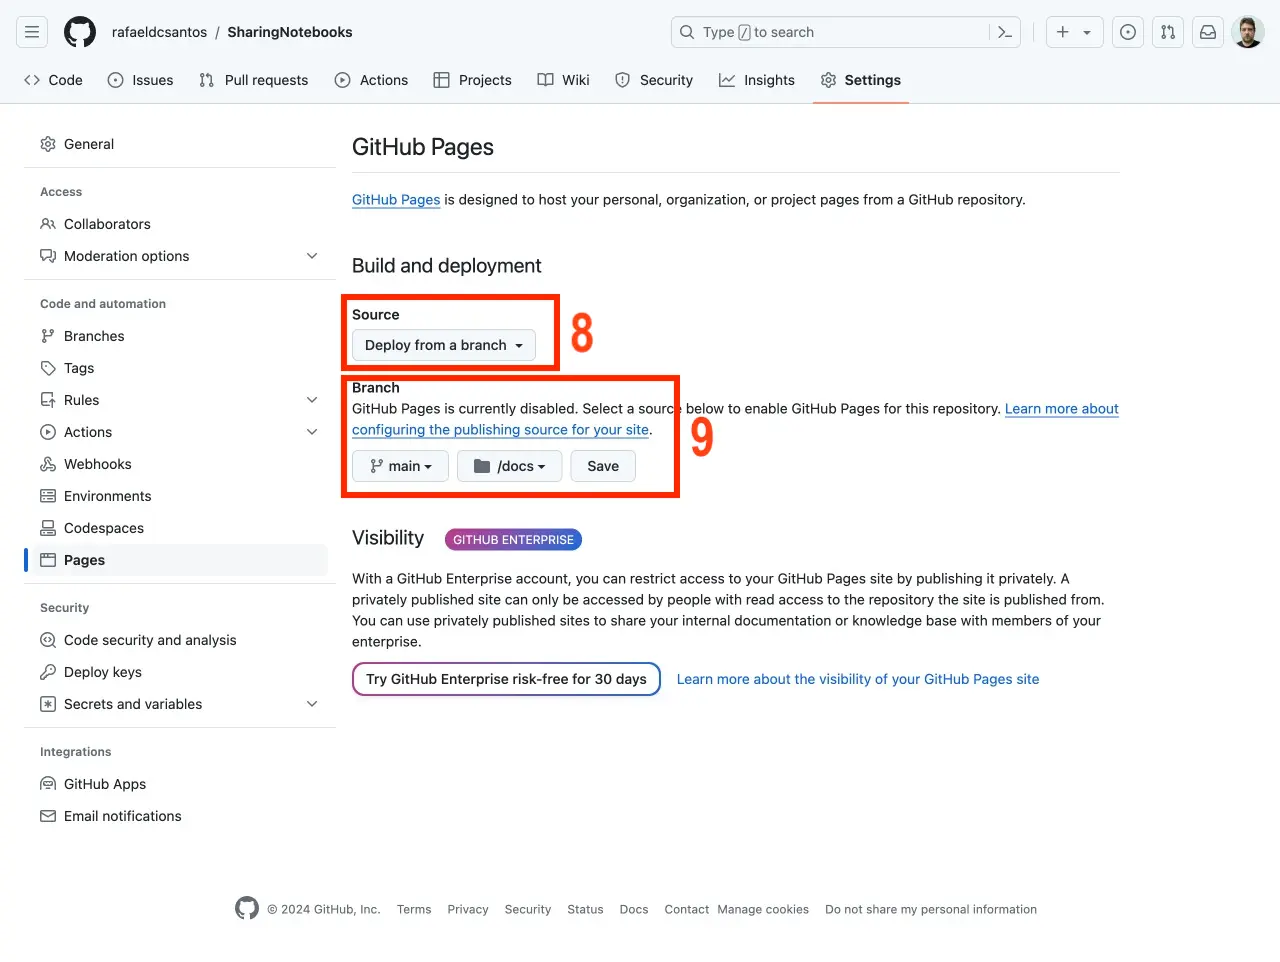
In the Source section (8) chose Deploy from a branch, and for Branch select main and for folder choose docs/. Options should look like the ones in the figure below. Click on Save (9) (see Figure Page settings for the repository).
Clicking on the repository name should bring you back to the main repository window.
In this example the GitHub user name is rafaeldcsantos and the repository is SharingNotebooks. These are used to compose the remote repository URL: https://github.com/rafaeldcsantos/SharingNotebooks.git. Yours of course will be different; please keep this in mind when creating a repository under your GitHub account.
Cloning to a local directory
The steps to clone the project to a local directory are:
- Make sure your GitHub account allows authentication via ssh: run
ssh -T git@github.comand see if the output message mentions your username. - Change to a base directory, e.g. the one where you keep your projects.
- Create a local directory with the same name as your repository (
SharingNotebooks) - Change to this directory.
- Run
git clone https://github.com/rafaeldcsantos/SharingNotebooks.git .– make sure you have the dot (.) at the end of the command, and use your remote repository URL. If this command is successfull, the filesLICENSEandREADME.md, which were created when we created the repository, will be downloaded to the current directory.
Updating the local files
- Run the command
touch .nojekyllor similar – this will create an empty file named.nojekyllto avoid some automation processes on GitHub. - Edit the
README.mdjust to make some noticeable changes. - Run
git add .to prepare all new and modified files (but not the deleted files) to upload to GitHub. - Run
git commit -m "Your commit message here"to commit the changes with a comment. - Run
git remote set-url origin git@github.com:rafaeldcsantos/SharingNotebooks.git– this will update the URL of the remote repository named origin to the specified URL. This command will allow you to push changes to GitHub using ssh.
Make sure you use your username and repository name! - Run
git push -u origin mainto push the changes to GitHub. - Check your repository in GitHub for the changes you did in the file
README.md.
From that point on, all changes you do to any file in the work directory can be updated with:
git add .git commit -m "Add a comment here"git push origin main
Creating a Quarto Document
Use Visual Code Studio to create a file with extension .qmd in the directory we ran the git commands. The .qmd file is a pure text file; any editor could be used, I recommend Visual Code Studio since it is a good, free IDE which integrates nicely with Quarto.
Create the file with the menu option File/New File/Quarto Document. A simple boilerplate file will be created.
Add some Markdown code to the file and save it with a descriptive filename (in our example, Intro.qmd) – the .qmd extension is used for Quarto Markdown files, a variant of Markdown that is specifically designed to work with Quarto.
Quarto files will be converted to HTML (HyperText Markup Language), which is the markup language for documents that will be displayed in web browsers. In most cases we can to provide additional instructions on how the files will be converted through instructions in a _quarto.yml file.
Create a _quarto.yml in the same directory where the Intro.qmd is located. Its contents should be:
project:
  output-dir: docs
These instructions basically ensure that all results from the conversion will be stored in the directory docs under the working directory. This is the same directory we used as the destination directory for the pages we’ve set up in GitHub (see Figure Page settings for the repository).
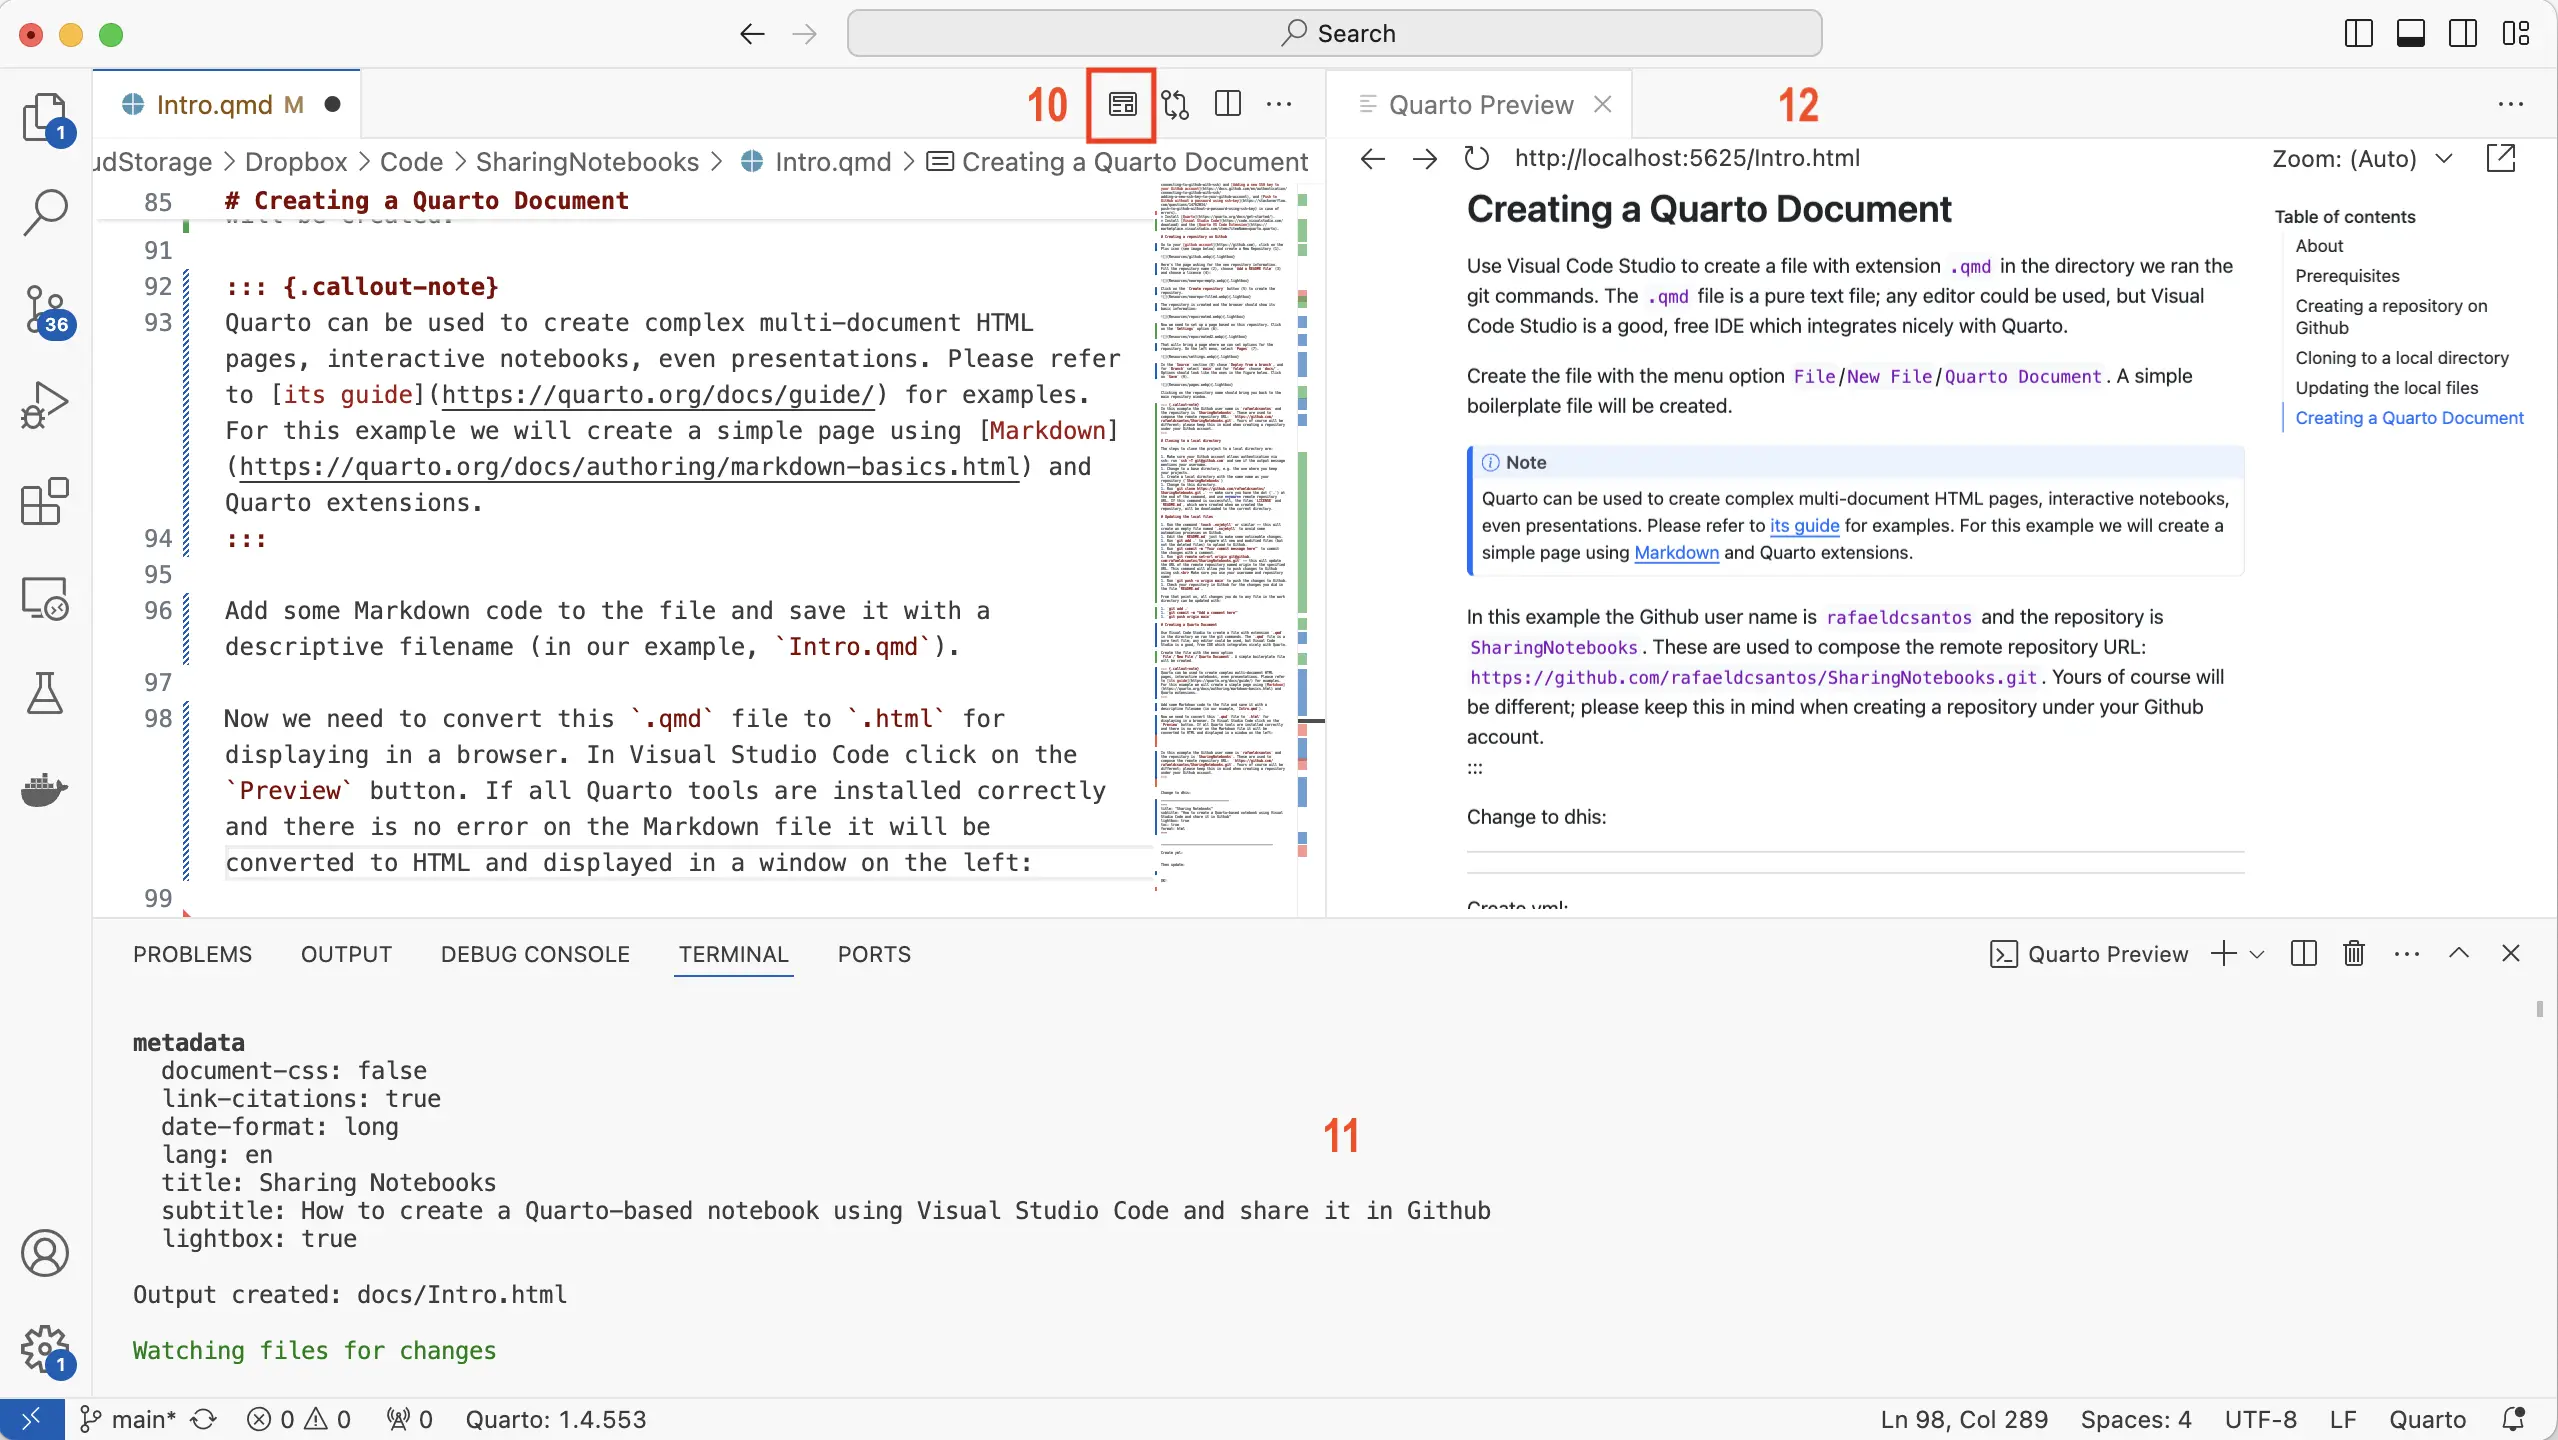
Now we need to convert this .qmd file to .html for displaying in a browser. In Visual Studio Code (see Figure Converting and displaying .qmd files in Visual Studio Code) click on the Preview button (10). If all Quarto tools are installed correctly and there are no errors on the Markdown file it will be converted to HTML, and success or error messages will be displayed in the terminal (11) and rendered result displayed in the Preview window (12):
.qmd files in Visual Studio Code
Pushing it back to GitHub
Now that we have the .html file generated from the .qmd file we need to push our project back to GitHub. Just run these commands:
git add .git commit -m "Be sure to use meaningful comments"git push origin main
Now open the URL https://rafaeldcsantos.github.io/SharingNotebooks/Intro.html to see the rendered file as a GitHub page!
After pushing the contents to GitHub, it may take a few minutes until the URL contents reflects our changes.
In case of problems
Recheck the steps, and make sure you are using the right names for repositories, files and directories.
In this example the GitHub user name is rafaeldcsantos and the repository is SharingNotebooks. These are used to compose the remote repository URL: https://github.com/rafaeldcsantos/SharingNotebooks.git. We cloned the repository and added a local file named Intro.qmd, which was converted to Intro.html and stored in the directory docs. After pushing the local files to GitHub we can see the results in the URL https://rafaeldcsantos.github.io/SharingNotebooks/Intro.html.